
Introduction
In a previous post I discussed how the Campus uses the information we put on GitHub to create Key Performance Indicators ⧉. Here, I will show you how we do use Google Cloud Platform’s Cloud Functions, Cloud Scheduler, and Secret Manager to do this automatically, every week. This data then feeds into a Dash application that Campus colleagues can use.
Below, I will initially show you how to do this locally. Then I will show you how to deploy it on GCP. Both are similar, except the GitHub API credentials are called slightly differently. Also, Cloud Functions is a little picky, don’t stress, it took me over 20 versions to get my function running properly.
Testing Locally
GitHub Personal Access Token
For this to work you need to create a GitHub Personal Access Token ⧉ that has permissions to call the GitHub API. Keep the token key safe for now, as we need it to call the API.
As the token is a gateway to GitHub, by-passing your password, it is important to keep it safe and not expose it directly in a function. Here, we use Google’s Secret Manager, which is currently in Beta testing. With Secret Manager, you can upload your token safely, and call it when required
Secret Manager can be found under the Security tab. Click Create Secret and call it a suitable name. Then either upload from a file or paste the token directly into the box. Once created your secret will have a Resource ID in the form of:
projects/<SECRET-ID>/secrets/<SECRET-NAME>/versions/<VERSION-ID>
To call it locally, the script below can be used. WARNING: Do not output the secret in a production environment, or expose this outside your machine.
from google.cloud import secretmanager_v1beta1 as secretmanager
import os
import json


class getKey:
    def __init__(self):
        self.__key_location_file = os.path.abspath(os.path.join(os.path.dirname(__file__),'key'))
        with open(self.__key_location_file + '/key_location.json', 'r') as json_file:
            self.__data = json.loads(json_file.read())
            self.__key_path = self.__data['data']['key_location']
            self.__client = secretmanager.SecretManagerServiceClient.from_service_account_json(self.__key_path)

    def access_secret_version(self, project_id, secret_id, version_id):

        name = self.__client.secret_version_path(project_id, secret_id, version_id)

        response = self.__client.access_secret_version(name)

        payload = response.payload.data.decode('UTF-8')

        return payload

if __name__ == '__main__':
    project_id = <PROJECT-ID>
    secret_id = <SECRET-ID>
    version_id = <VERSION-ID>
    GCP = getKey()
    GCP.access_secret_version(project_id, secret_id, version_id)
Where the local GCP credential JSON is stored in a folder called key. See this guide ⧉ for more information about creating and using this JSON key. Also, our previous post here ⧉ also shows how to do this.
GitHub API Call
Here we want to call GitHub’s API and return information about our projects. As described in our previous GitHub post ⧉ each of the Campus’ projects is a GitHub Issue with associated assignees (those who work on the project) and labels (descriptors of the project, ranging from coding language used, to size of the project). Each project is also assigned a column on a separate Kanban board, whereby the column denotes the stage in the project lifecycle (e.g., Ideas, or Complete). Obtaining the assignees and labels for each project is fairly simple using PyGitHub ⧉; however, we need to call the project Kanban board to gain the project lifecycle stage.
 Image of the project Kanban portfolio board used by the Campus
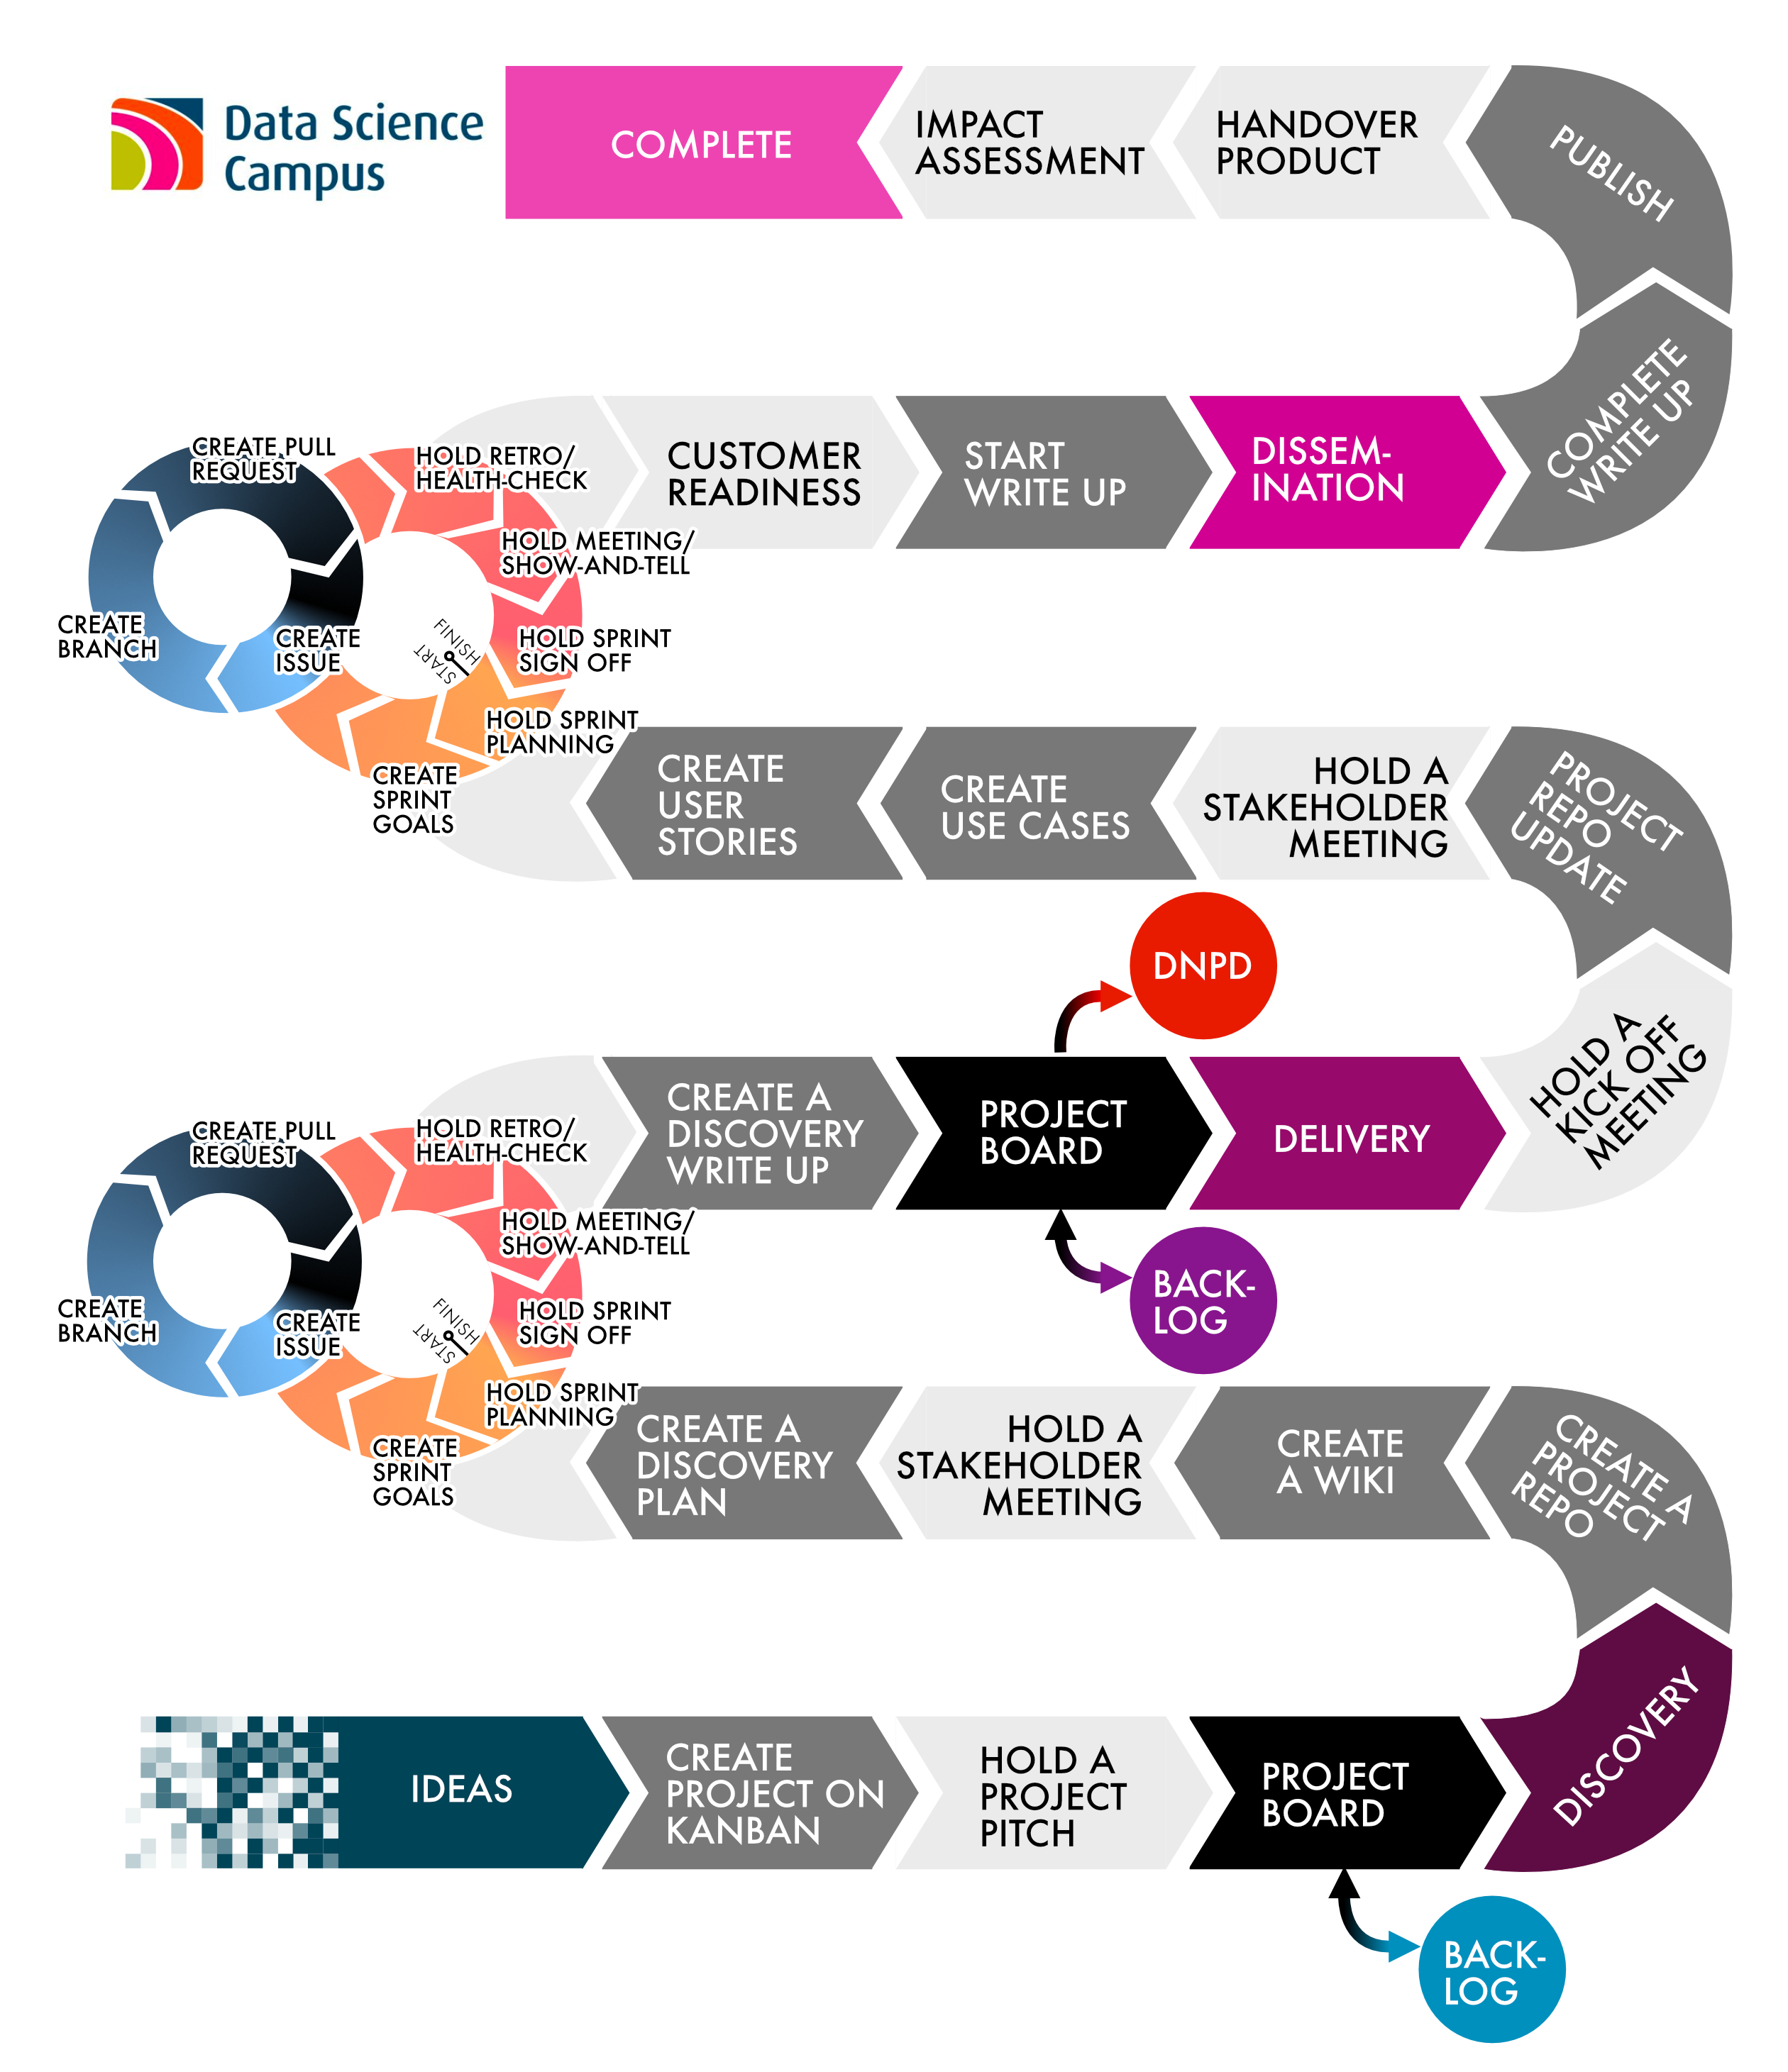 Image of the project lifecycle and pathway used by the Data Science Campus
The code for this is below. The top line creates the connection to the GitHub API using your token. The second line is used to eventually call the repository the Issues are stored in, and the third line sets up the call for the project Kanban, which is located at the main repository page.
The first loop retrieves all the projects in the project Kanban board, including the column name, which is the project lifecycle stage. The second loop gets all labels and assignees from each Issue (project) that exists on the Kanban board. Lastly, a pandas DataFrame is created to store the data.
def create_data_frame():
    g = Github(<GITHUB-TOKEN>)
    user = g.get_user(<ORG-NAME>)
    org = g.get_organization(<ORG-NAME>)
    projects = org.get_projects()

    # Create Lists and DataFrame
    project_name_list = []
    project_status_list = []
    df = pd.DataFrame(columns=['title', 'state', 'date', 'modified'])

    # Get list of projects and states from kanban board
    for project in projects:
        if project.name == 'all of our projects':
            columns = project.get_columns()
            for column in columns:
                cards = column.get_cards()
                for card in cards:
                    content = card.get_content()
                    if content != None:
                        project_name_list.append(content.title)
                        project_status_list.append(column.name)

    # Get labels and assignees from project-planning issues
    project_planning_repo = user.get_repo(<REPO-NAME>)
    issues = project_planning_repo.get_issues(state='all')

    i = 0

    for issue in issues:
        if issue.title in project_name_list:
            df.loc[i, 'title'] = issue.title
            idx = project_name_list.index(issue.title)
            df.loc[i, 'state'] = project_status_list[idx]
            df.loc[i, 'date'] = issue.created_at.strftime('%Y-%m-%d')
            df.loc[i, 'modified'] = issue.updated_at.strftime('%Y-%m-%d')

            labels = issue.get_labels()
            for label in labels:
                if label.name not in list(df.columns.values):
                    df[label.name] = 0
                    df.loc[i, label.name] = 1
                else:
                    df.loc[i, label.name] = 1
            people = issue.assignees
            for person in people:
                if person.login not in list(df.columns.values):
                    df[person.login] = 0
                    df.loc[i, person.login] = 1
                else:
                    df.loc[i, person.login] = 1
            i = i + 1
    df = df.fillna(0)
    return df
Upload to bucket
The last script to create is to upload the data to your bucket. This again uses your local JSON credential key. It then uploads the DataFrame as a Comma Separated Value (CSV) file.
from google.cloud import storage
import os
import json


class GCPUploader:
    def __init__(self):
        self.__key_location_file = os.path.abspath(os.path.join(os.path.dirname(__file__),'key'))
        with open(self.__key_location_file + '/key_location.json', 'r') as json_file:
            self.__data = json.loads(json_file.read())
            self.__key_path = self.__data['data']['key_location']
        self.__storage_client = storage.Client.from_service_account_json(self.__key_path)

    def upload_blob(self, project_name, df, destination_blob_name):
        """Uploads a file to the bucket."""

        bucket = self.__storage_client.bucket(project_name)
        blob = bucket.blob(destination_blob_name)
        blob.upload_from_string(df.to_csv(), 'text/csv')


if __name__ == '__main__':

    df = create_data_frame()
    project_name = <PROJECT-NAME>
    destination_blob_name = <BLOB-NAME>
    upload = GCPUploader()
    upload.upload_blob(project_name, df, destination_blob_name)
Deploying to Google Cloud Platform
Deploy your function to Cloud Functions
To deploy to Cloud Functions click Cloud Functions in the navigation bar of Google Cloud Platform. Then click Create Function. Give your function a suitable name and memory allocation. As we want to use Cloud Scheduler to call the function at an set time, we need to set the trigger to be Cloud Pub/Sub. Set the runtime to Python and then paste your function into the box for main.py. Using the example code above our function will be:
from google.cloud import secretmanager_v1beta1 as secretmanager
from google.auth import compute_engine
from google.cloud import storage
from github import Github
import pandas as pd
from datetime import date


def access_secret_version(project_id, secret_id, version_id):
    credentials = compute_engine.Credentials()
    client = secretmanager.SecretManagerServiceClient(credentials=credentials)
    name = client.secret_version_path(project_id, secret_id, version_id)
    response = client.access_secret_version(name)
    payload = response.payload.data.decode('UTF-8')
    return payload

def create_data_frame():
    token = access_secret_version('<SECRET-ID>', '<SECRET-NAME>', <VERSION-ID>)
    g = Github(token)
    user = g.get_user(<ORG-NAME>)
    org = g.get_organization(<ORG-NAME>)
    projects = org.get_projects()

    # Create Lists and DataFrame
    project_name_list = []
    project_status_list = []
    df = pd.DataFrame(columns=['title', 'state', 'date', 'modified'])

    # Get list of projects and states from kanban board
    print('Connecting to GitHub API ')
    for project in projects:
        if project.name == 'all of our projects':
            columns = project.get_columns()
            for column in columns:
                cards = column.get_cards()
                for card in cards:
                    content = card.get_content()
                    if content != None:
                        project_name_list.append(content.title)
                        project_status_list.append(column.name)

    # Get labels and assignees from project-planning issues
    project_planning_repo = user.get_repo('project-planning')
    issues = project_planning_repo.get_issues(state='all')

    i = 0

    for issue in issues:
        if issue.title in project_name_list:
            df.loc[i, 'title'] = issue.title
            idx = project_name_list.index(issue.title)
            df.loc[i, 'state'] = project_status_list[idx]
            df.loc[i, 'date'] = issue.created_at.strftime('%Y-%m-%d')
            df.loc[i, 'modified'] = issue.updated_at.strftime('%Y-%m-%d')

            labels = issue.get_labels()
            for label in labels:
                if label.name not in list(df.columns.values):
                    df[label.name] = 0
                    df.loc[i, label.name] = 1
                else:
                    df.loc[i, label.name] = 1
            people = issue.assignees
            for person in people:
                if person.login not in list(df.columns.values):
                    df[person.login] = 0
                    df.loc[i, person.login] = 1
                else:
                    df.loc[i, person.login] = 1
            i = i + 1
    df = df.fillna(0)
    return df

def upload_blob(data, context):
    df = create_data_frame()
    credentials = compute_engine.Credentials()
    project = '<PROJECT-ID>'
    storage_client = storage.Client(credentials=credentials, project=project)
    bucket_name = '<BUCKET-NAME>'
    bucket = storage_client.bucket(bucket_name)
    destination_blob_name = '<FILE-NAME>'
    blob = bucket.blob(destination_blob_name)
    blob.upload_from_string(df.to_csv(), 'text/csv')
In the requirements.txt tab add all the dependencies and their versions:
google-cloud-secret-manager==0.1.1
google-auth==1.11.0
google-cloud-storage==1.25.0
PyGitHub==1.43.6
pandas==0.24.2
tqdm==4.42.1
For function to execute state upload_blob. Click deploy.
To test the function, click the ellipses under Actions and click Test function.
Setup Cloud Scheduler to run the function periodically
On the GCP homepage, click Cloud Scheduler. Click Create Job. Give it a suitable name, description, and select the frequency you want it to be called. This is specified in unix-cron format ⧉. For every Monday at 09:00 am, this would be 0 9 * * 1. Set the time zone, and choose the target, here Pub/Sub. Under topic type the name of the function you created in Cloud Functions. Then for payload, type anything you want, such as Get data.
Once setup, to run the scheduler immediately click RUN NOW. This should call your function and upload the data to the specified bucket.
Implement into your Dash App
If the bucket destination and filename are the same as you previously called within your Dash app, then you shouldn’t need to change anything. Otherwise, specify the new path and re-deploy your application to App Engine.
Congratulations, your application will now update each Monday with new data gained from GitHub. On your application site you could then easily add a ‘Download Data’ button so that users can easily download the latest data if needed.