
This guide has been created to help users deploy a dash application using Google Cloud Platform (GCP) App Engine, using a locally-stored file. For more information, visit the GitHub repository.
Note: This blog has been updated since it was first posted. See the Version control section at the bottom of the post for changes.
Step 1: Creating your Dash Application
Visit our GitHub repository ⧉ to view all the files.
Important files:
main.pyis the Dash application.gcloudignoreis like.gitignorefor GitHub, it tells GCP what not to upload (for example here, I don’t want to upload all the screenshots used in this guide)app.yamlis used to run the Dash app on GCP using gunicorn ⧉, which is needed for GCPrequirements.txtcomprises the packages needed to run the Dash app (important: gunicorn is required in this file at the bare minimum)
main.py
The main.py python script comprises the following, which are split into sections below. The full script can be found at the bottom of this post.
Python Functions
This section has three functions: add numbers, multiply numbers and build banner. The first two are self-explinatory, the last just creates an image banner based on a file in the assets folder.
Load Data
This section loads the csv file from the /data folder, creates a pandas dataframe and then applies the add and multiply number functions.
Text
This section just contains free text to append to the Dash app.
Dash
This contains the Dash setup values, including the /assets folder.
Project Dashboard
This is the core of the Dash application.
app.layout = html.Div(children=[
    html.H1(
        children=[
            build_banner(),
            html.P(
                id='instructions',
                children=dash_text),
            ]
    ),

    dcc.Graph(
        id='example-graph',
        figure={
            'data': [
                {'x': data_df.index.values.tolist(), 'y': data_df['add_num'], 'type': 'bar', 'name': 'Add Numbers'},
                {'x': data_df.index.values.tolist(), 'y': data_df['multiply_num'], 'type': 'bar', 'name': 'Multiply Numbers'},
            ],
            'layout': {
                'title': 'Dash Data Visualization'
            }
        }
    )
])
This simply creates the image banner, then adds the free text (which has an id whose style can be edited in the /assets/dsc.css file, then adds the graph based on the loaded and manipulated data from /data/datacsv.
main
if __name__ == '__main__':
    app.server(host='0.0.0.0', port=8080, debug=True)
It is important you make a note of the port number and host!
requirements.txt
Here, this is the requirements.txt file, which tells GCP which packages to install.
Click==7.0
dash==1.6.0
dash-core-components==1.5.0
dash-html-components==1.0.1
dash-renderer==1.2.0
Flask==1.1.1
Flask-Compress==1.4.0
future==0.18.2
itsdangerous==1.1.0
Jinja2==2.10.3
MarkupSafe==1.1.1
numpy==1.16.5
pandas==0.24.2
pytz==2019.3
retrying==1.3.3
six==1.13.0
Werkzeug==0.16.0
gunicorn==19.3.0
app.yaml
This is a really important file, and needs to replicate what is put in your main.py script.
service: default
runtime: python37

basic_scaling:
    max_instances: 2
    idle_timeout: 10m

resources:
    cpu: 1
    memory_gb: 1
    disk_size_gb: 10

entrypoint: gunicorn -b 0.0.0.0:8080 main:server
This file tells GCP how to create the application. The first line specifies the service name, which becomes the prefix of the URL the app will run on. Yhe second line specifies that we want to build using python 3.7. The basic_scaling and resources blocks tell App Engine what the environment should be. Here we are limiting the instances to 2, on a machine with 1 CPU and 1 GB of RAM. The entrypoint line must replicate what is at the end of main.py (the host and port numbers), as well as what you call the python script (here main.py = main). This is the most likely file to corrupt a build.
Step 2: Deploy your Application to Google Cloud Platform
This guide builds on other guides such as Jamie Phillips’ ⧉. However, we were not able to successfully deploy a Dash app following Jamie’s, or others, examples without heavy tweaks. We also include additional python functions to load data in our example here (Goodbye, World).
The following steps are to deploy a Dash application to GCP. If your app doesn’t work locally, you should fix that first as it won’t work on GCP (even if you pray real hard). If it works locally, but it doesn’t deploy, the majority of the time it will be due to the app.yaml file.
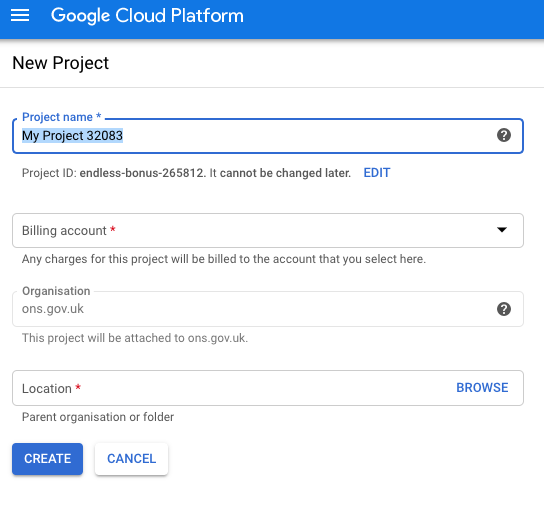
Step 2.1: Make a Project on GCP
Using the CLI or the Console Interface online (which we use below), create a new project with a suitable project name (here we call it dash-example).
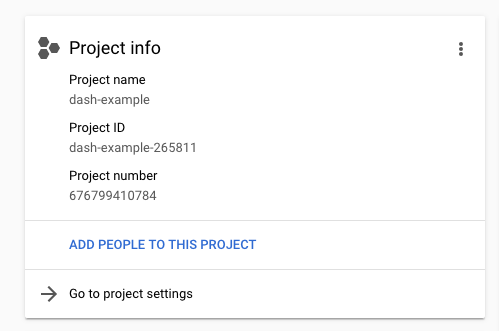
Step 2.2: Make Yourself the Owner of Project
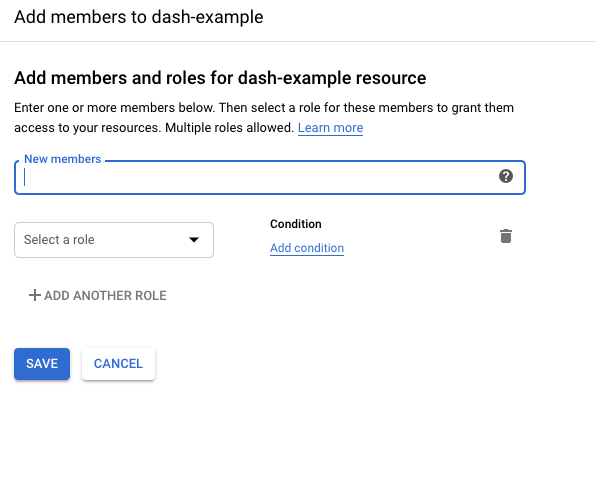
Make sure the project you’ve just created is selected on the console, then click ‘ADD PEOPLE TO THIS PROJECT’.
Then input your user name and set the role to Project > Owner.
That’s it for now on the Google Cloud Platform Console.
Step 2.3: Deploy Using gcloud Command Line Tool
If you haven’t installed the gcloud command line tool ⧉ do so now.
Next, check your project is active in gcloud using:
gcloud config get-value project
Which will print the following on screen:
Your active configuration is: [default]

my-project-id
To change the project to your desired project, type:
gcloud config set project project-id
Next, to deploy, type:
gcloud app deploy
Then select your desired region (we use europe-west2, which is the London region)
If you have setup your configuration correctly then it will deploy the Dash app (after a while), which will be available at:
https://project-id.appspot.com/
The example app above is hosted here ⧉.
Visit our GitHub repository ⧉ to view all the files.
Step 3: Restrict Access to your Application
By default your application will be accessible to anyone in the world. To restrict the access you can use Firewall Rules ⧉.
main.py script
import dash
import dash_core_components as dcc
import dash_html_components as html
import pandas as pd
import os


# -------------------------- PYTHON FUNCTIONS ---------------------------- #


def add_numbers(first_num,second_num):
    new_num = first_num + second_num
    return new_num

def multiply_numbers(first_num,second_num):
    new_num = first_num * second_num
    return new_num


def build_banner():
    return html.Div(
        id='banner',
        className='banner',
        children=[
            html.Img(src=app.get_asset_url('dsc-logo2.png')),
        ],
    )


# -------------------------- LOAD DATA ---------------------------- #


csv_files_path = os.path.join('data/data.csv')

data_df = pd.read_csv(csv_files_path)

add_num_list = []
multiply_num_list = []

for index, row in data_df.iterrows():
    add_num_list.append(add_numbers(row['first_num'], row['second_num']))
    multiply_num_list.append(multiply_numbers(row['first_num'], row['second_num']))

data_df['add_num'] = add_num_list
data_df['multiply_num'] = multiply_num_list


# -------------------------- TEXT ---------------------------- #


dash_text = '''

This is an example of a DSC dashboard.
'''


# -------------------------- DASH ---------------------------- #


external_stylesheets = ['https://codepen.io/chriddyp/pen/bWLwgP.css']

app = dash.Dash(__name__, external_stylesheets=external_stylesheets, assets_folder='assets')
server = app.server

app.config.suppress_callback_exceptions = True


# -------------------------- PROJECT DASHBOARD ---------------------------- #


app.layout = html.Div(children=[
    html.H1(
        children=[
            build_banner(),
            html.P(
                id='instructions',
                children=dash_text),
            ]
    ),

    dcc.Graph(
        id='example-graph',
        figure={
            'data': [
                {'x': data_df.index.values.tolist(), 'y': data_df['add_num'], 'type': 'bar', 'name': 'Add Numbers'},
                {'x': data_df.index.values.tolist(), 'y': data_df['multiply_num'], 'type': 'bar', 'name': 'Multiply Numbers'},
            ],
            'layout': {
                'title': 'Dash Data Visualization'
            }
        }
    )
])


# -------------------------- MAIN ---------------------------- #


if __name__ == '__main__':
    app.run_server(host='0.0.0.0', port=8080, debug=True, use_reloader=False)
Version control
- v.1 of this blog post used a
flexenvironment in theapp.yamlfile. However, this was causing the application to continuously run on GCP, causing increased costs. - v.2 is the current blog post, which uses a
standardenvironment.