
Visit our GitHub repository ⧉ to view all the files.
This guide builds on our previous post about how to deploy your dash application with Google Cloud Platform’s App Engine ⧉. This time we want to use Google Cloud’s storage bucket to load data, so when we change the original data, the app updates automatically on a page refresh.
Step 1: Making Your Dash App Load Data on Page Refresh
In my first draft I skipped straight to uploading your data to GCP. However, this is the easy bit. The hardest bit of this pipeline is to make your Dash application refresh the input data on page refresh. There are multiple website suggesting that using global variables, as I did here, is not the way to use Dash. This is because changes to the data will be pushed to all users of the application. This is fine for updated, initial raw data, but very bad for if filtered data is pushed to all.
Here, we only push changes to the initial, raw data. Therefore, we use global variables to solve this problem.
The major changes to our application from previous guides comes in the form of two python functions: data_in() and app_layout(). The full script for main.py can be found at the bottom of this post.
data_in()
This function replaces the ‘Load Data’ section in the previous guides. We also introduce a better way of deciding if we want to load the data locally, or from the cloud (and then running locally, or on the cloud). It then provides the data pandas DataFrame as before.
def data_in():

    if cloud == False:
        data = os.path.join('data/data.csv')

    else:
        project = 'dash-example-265811'
        project_name = 'dash-example-265811.appspot.com'
        folder_name = 'data'
        file_name = 'data.csv'

        if local == True:
            GCP = GCPDownloaderLocal() # run locally
        else:
            GCP = GCPDownloaderCloud()  # run on cloud

        bytes_file = GCP.getData(project, project_name, folder_name, file_name)
        s = str(bytes_file, encoding='utf-8')
        data = StringIO(s)

    data_df = pd.read_csv(data)

    add_num_list = []
    multiply_num_list = []

    for index, row in data_df.iterrows():
        add_num_list.append(add_numbers(row['first_num'], row['second_num']))
        multiply_num_list.append(multiply_numbers(row['first_num'], row['second_num']))

    data_df['add_num'] = add_num_list
    data_df['multiply_num'] = multiply_num_list

    return data_df
app_layout()
This is the magic behind Dash’s ability to update the site with your new data. In essence, we have just copied what was in the ‘Project Dashboard’ section previously, and called the data_in() function at the beginning.
def app_layout():
    data_df = data_in()
    return html.Div(children=[
        html.H1(
            children=[
                build_banner(),
                html.P(
                    id='instructions',
                    children=dash_text),
                ]
        ),

        dcc.Graph(
            id='example-graph',
            figure={
                'data': [
                    {'x': data_df.index.values.tolist(), 'y': data_df['add_num'], 'type': 'bar', 'name': 'Add Numbers'},
                    {'x': data_df.index.values.tolist(), 'y': data_df['multiply_num'], 'type': 'bar', 'name': 'Multiply Numbers'},
                ],
                'layout': {
                    'title': 'Dash Data Visualization'
                }
            }
        )
    ])
Other Updates
In the ‘Dash’ section four lines of code have been added.
local = False
cloud = True

data_df = data_in()

app.layout = app_layout
The first two are just global variables specifying where you want to load and run the data. Then the data DataFrame is created initially before app_layout is run to update the application. Note, app_layout here should not have parentheses at the end.
Test and Update Data
To test your application, simply run main.py. The application should be available at 0.0.0.0:8080 ⧉. Next, alter the data in data/data.csv. Refresh 0.0.0.0:8080 ⧉ to see the graph change.
Step 2: Upload Your Data to GCP
Google’s documentation provides a detailed guide on how to upload objects ⧉, here we simply this into the three main ways we use:
Using the GCP Online Browser
From Google’s documentation:
- Open the Cloud Storage browser in the Google Cloud Console ⧉.
- In the list of buckets, click on the name of the bucket that you want to upload an object to. You may want to create a separate folder within the bucket too.
- In the Objects tab for the bucket, either:
- Drag and drop the desired files from your desktop or file manager to the main pane in the Cloud Console.
- Click the Upload Files button, select the files you want to upload in the dialog that appears, and click Open.
Using gsutil command line
This is probably the easiest method (install gsutil guide ⧉). Simply type into your command line:
gsutil cp [OBJECT_LOCATION] gs://[DESTINATION_BUCKET_NAME]/
Using Python
In our GitHub repository ⧉ linked to this guide we provide a python file called dataUpload.py (code at the bottom of this post, also). This can be used to upload data to a specified bucket. However, this involves multiple additional steps to authorise your credentials - however, you will need to do this to download the data anyway!
- Open the Cloud Storage browser in the Google Cloud Console ⧉.
- Hover over
APIs & Serviceson the left hand side, and then clickCredentials - Click
Create credentials, thenService account key.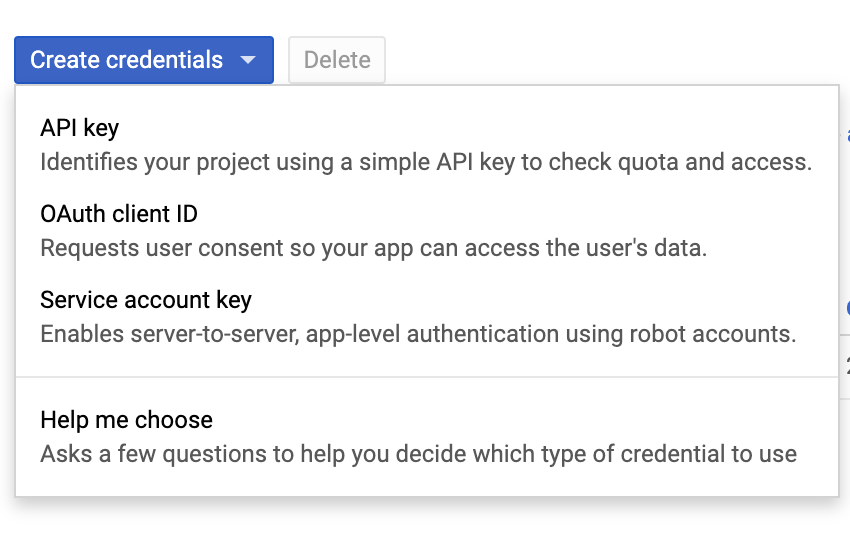
- Select
New service account, then enter the service account name, change the role to Owner, and make sure the download is set to JSON.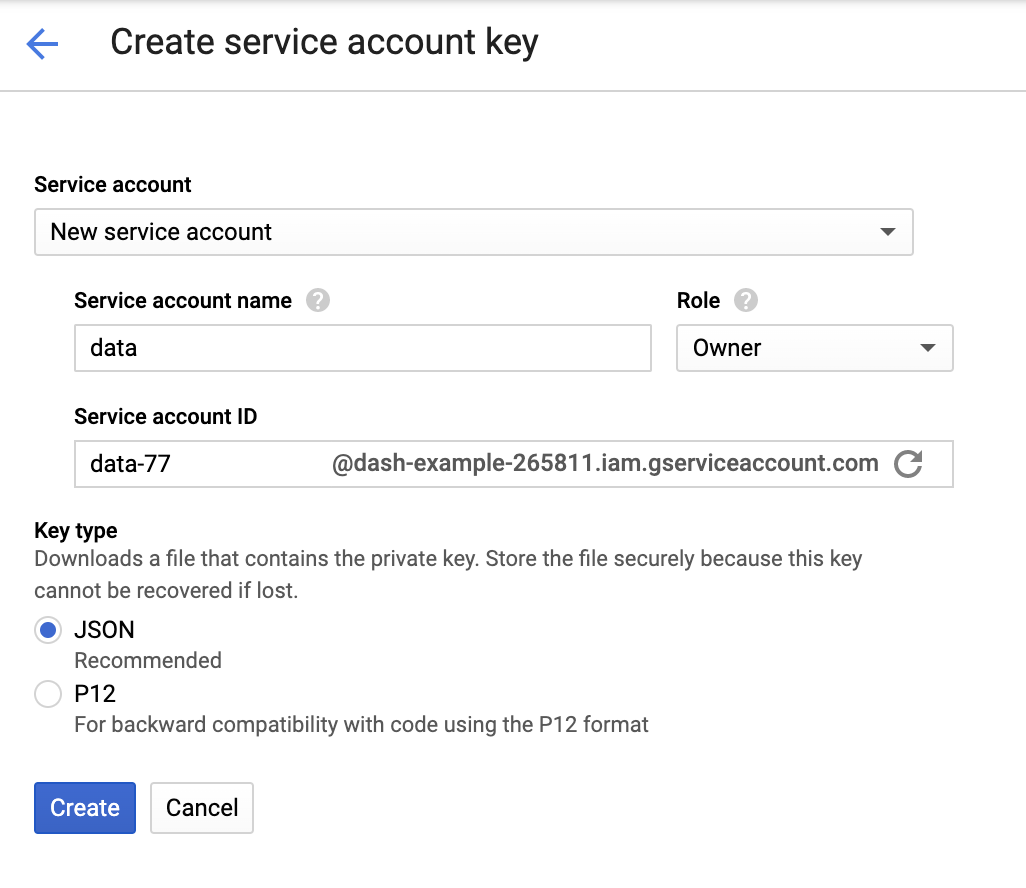
- Save in a safe place (not
/Downloads!)
Lastly, you want to tell dataUpload.py where to look for the key. To avoid exposing key locations online, create a new file called key_location.json in /data/keys with the structure:
{
  "data": {
    "key_location": "/path/to/file.json"
  }
}
Note, key_location.json will not be uploaded to GitHub or GCP as it is included in .gitignore and .googleignore files. However, if you delete or edit these, it may.
Step 3: Link the Data to Your Dash App and Test Locally
Before pushing the changes back to GCP. It is worth checking your data can be retrieved and loaded correctly. If you haven’t downloaded the credential JSON key as shown above (and created the key_location.json file to show where the key can be found), please do so now.
We can then link the data in main.py by changing the global variables ‘local and cloud to both be True.
This will call the GCPDownloaderLocal class from the dataDownloader.py python script and obtain the data. This python script is available at our GitHub repository ⧉ and the bottom of this post.
Your Dash app should be available as normal at 0.0.0.0:8000 ⧉.
Step 4: Push the Changes to GCP
Whereas when you run the code locally you require the JSON authentication, you do not when the data and dash application are part of the same project on Google Cloud Platform.
In main.py change the global variable ‘local to be False and cloud to be True. This will call the GCPDownloaderCloud class in dataDownloader.py.
This will call the downloadDataCloud.py python script.
Next, push the changes to GCP using the gcloud command line tool.
First, check your project is active in gcloud using:
gcloud config get-value project
Which will print the following on screen:
Your active configuration is: [default]

my-project-id
To change the project to your desired project, type:
gcloud config set project project-id
Next, to deploy, type:
gcloud app deploy
Click y when prompted. Your app will be available at:
https://project-id.appspot.com/
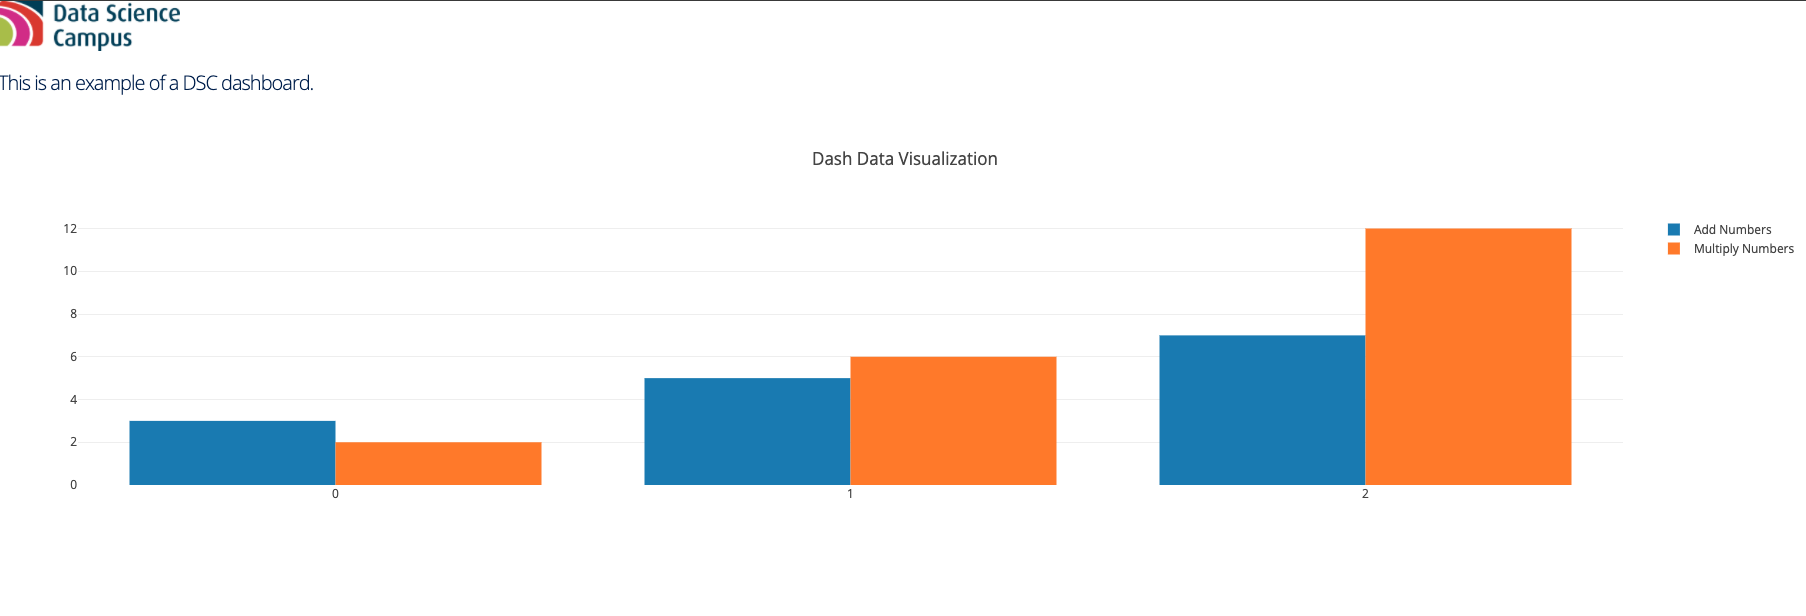
The screenshot below shows the original data in data.csv.
The screenshot below shows the edited data in data.csv, which we pushed to the GCP bucket.
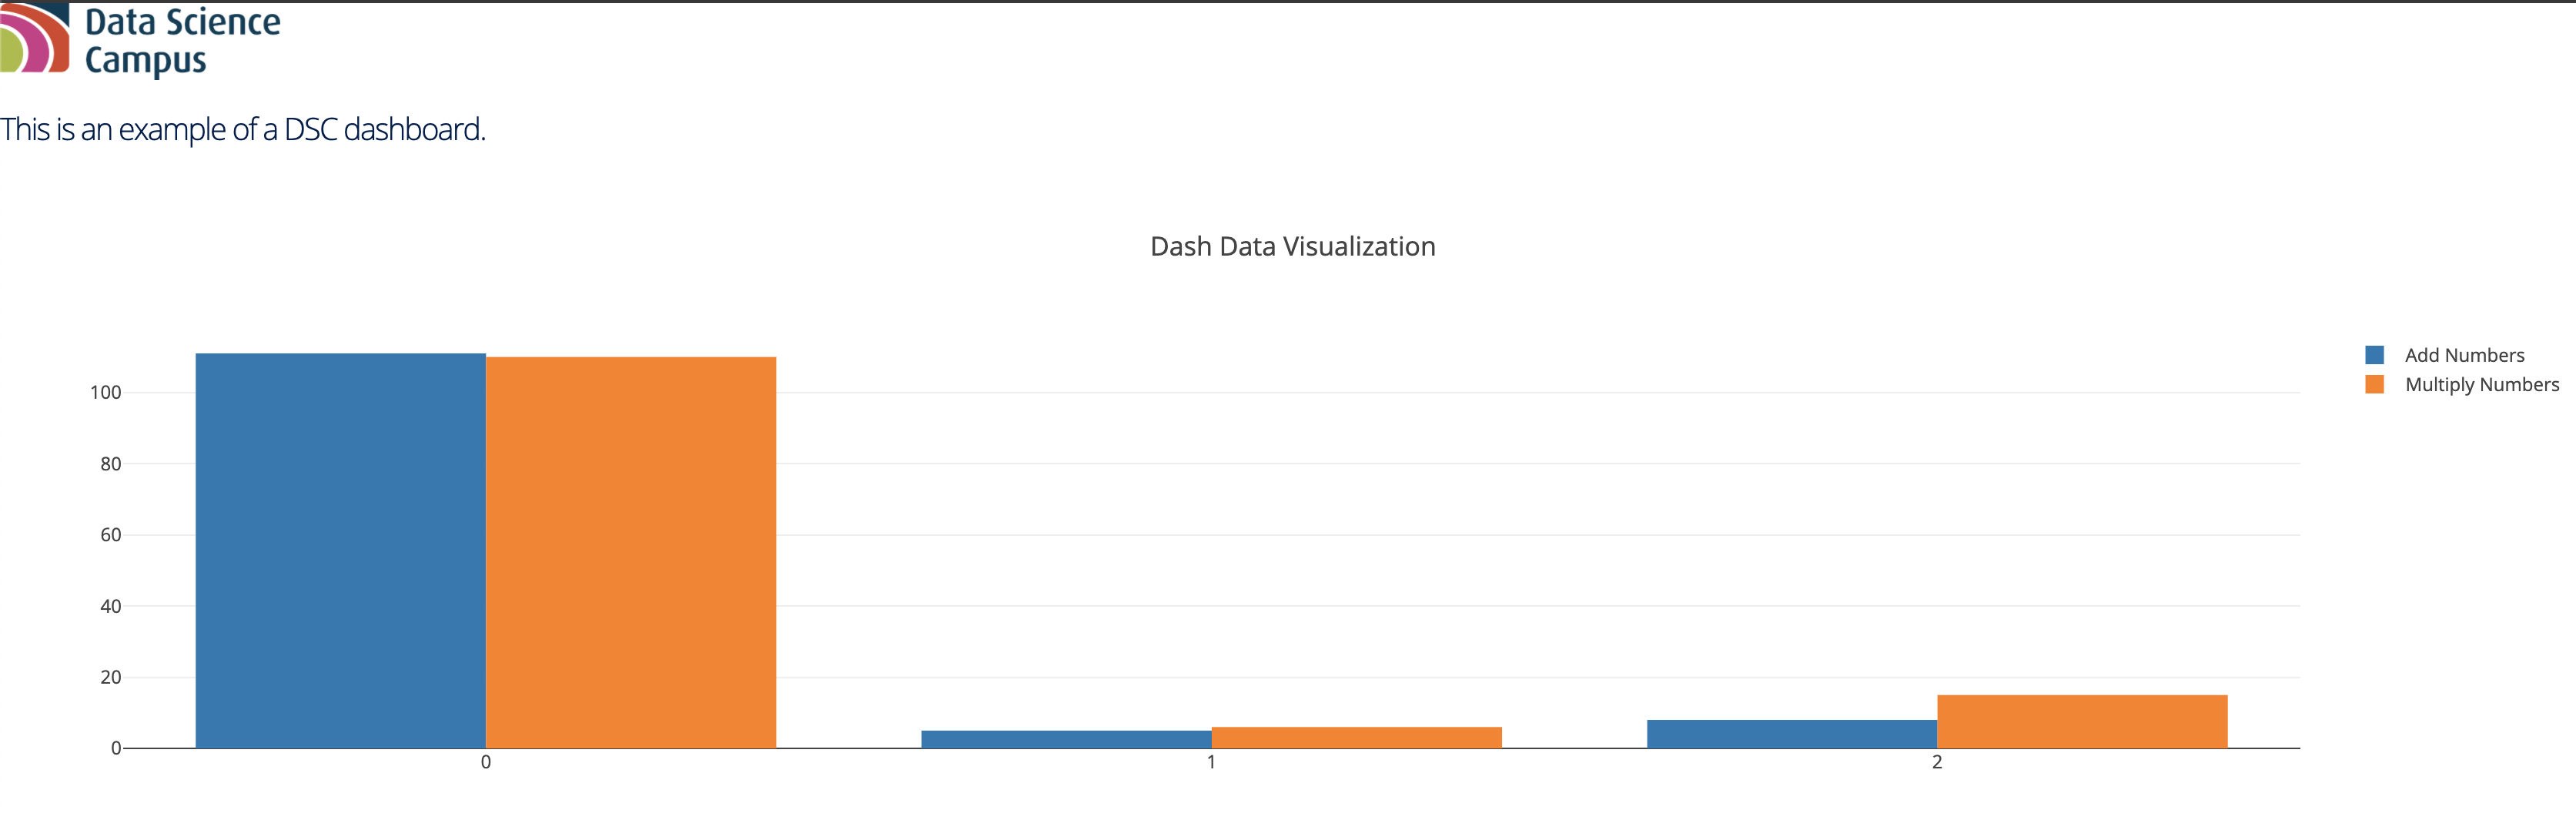
This app is running here ⧉.
Visit our GitHub repository ⧉ to view all the files.
main.py script
import dash
import dash_core_components as dcc
import dash_html_components as html
import pandas as pd
from io import StringIO
import os

from data.dataDownloader import GCPDownloaderLocal, GCPDownloaderCloud

# -------------------------- PYTHON FUNCTIONS ---------------------------- #


def add_numbers(first_num,second_num):
    new_num = first_num + second_num
    return new_num

def multiply_numbers(first_num,second_num):
    new_num = first_num * second_num
    return new_num


def build_banner():
    return html.Div(
        id='banner',
        className='banner',
        children=[
            html.Img(src=app.get_asset_url('dsc-logo2.png')),
        ],
    )

def data_in():

    if cloud == False:
        data = os.path.join('data/data.csv')

    else:
        project = 'dash-example-265811'
        project_name = 'dash-example-265811.appspot.com'
        folder_name = 'data'
        file_name = 'data.csv'

        if local == True:
            GCP = GCPDownloaderLocal() # run locally
        else:
            GCP = GCPDownloaderCloud()  # run on cloud

        bytes_file = GCP.getData(project, project_name, folder_name, file_name)
        s = str(bytes_file, encoding='utf-8')
        data = StringIO(s)

    data_df = pd.read_csv(data)

    add_num_list = []
    multiply_num_list = []

    for index, row in data_df.iterrows():
        add_num_list.append(add_numbers(row['first_num'], row['second_num']))
        multiply_num_list.append(multiply_numbers(row['first_num'], row['second_num']))

    data_df['add_num'] = add_num_list
    data_df['multiply_num'] = multiply_num_list

    return data_df

def app_layout():
    data_df = data_in()
    return html.Div(children=[
        html.H1(
            children=[
                build_banner(),
                html.P(
                    id='instructions',
                    children=dash_text),
                ]
        ),

        dcc.Graph(
            id='example-graph',
            figure={
                'data': [
                    {'x': data_df.index.values.tolist(), 'y': data_df['add_num'], 'type': 'bar', 'name': 'Add Numbers'},
                    {'x': data_df.index.values.tolist(), 'y': data_df['multiply_num'], 'type': 'bar', 'name': 'Multiply Numbers'},
                ],
                'layout': {
                    'title': 'Dash Data Visualization'
                }
            }
        )
    ])


# -------------------------- TEXT ---------------------------- #


dash_text = '''

This is an example of a DSC dashboard.
'''


# -------------------------- DASH ---------------------------- #


external_stylesheets = ['https://codepen.io/chriddyp/pen/bWLwgP.css']

app = dash.Dash(__name__, external_stylesheets=external_stylesheets, assets_folder='assets')
server = app.server

local = False
cloud = True

data_df = data_in()

app.layout = app_layout
app.config.suppress_callback_exceptions = True


# -------------------------- MAIN ---------------------------- #


if __name__ == '__main__':
    app.run_server(host='0.0.0.0', port=8080, debug=True, use_reloader=False)
app.yaml files
service: default
runtime: python37

basic_scaling:
    max_instances: 2
    idle_timeout: 10m

resources:
    cpu: 1
    memory_gb: 1
    disk_size_gb: 10

entrypoint: gunicorn -b 0.0.0.0:8080 main:server
dataDownloader.py script
from google.cloud import storage
from google.auth import compute_engine
import os
import json


class GCPDownloaderLocal:
    def __init__(self):
        self.__key_location_file = os.path.abspath(os.path.join(os.path.dirname(__file__),'key'))
        with open(self.__key_location_file + '/key_location.json', 'r') as json_file:
            self.__data = json.loads(json_file.read())
            self.__key_path = self.__data['data']['key_location']
        self.__storage_client = storage.Client.from_service_account_json(self.__key_path)

    def getData(self, project, project_name, folder_name, file_name):
        bucket = self.__storage_client.get_bucket(project_name)
        blob = bucket.blob(folder_name + '/' + file_name)
        content = blob.download_as_string()
        return content


class GCPDownloaderCloud:

    def getData(self, project, project_name, folder_name, file_name):
        credentials = compute_engine.Credentials()
        storage_client = storage.Client(credentials=credentials, project=project)
        bucket = storage_client.get_bucket(project_name)
        blob = bucket.blob(folder_name + '/' + file_name)
        content = blob.download_as_string()
        return content
dataUpload.py script
from google.cloud import storage
import os
import json


class GCPUploader:
    def __init__(self):
        self.__key_location_file = os.path.abspath(os.path.join(os.path.dirname(__file__),'key'))
        with open(self.__key_location_file + '/key_location.json', 'r') as json_file:
            self.__data = json.loads(json_file.read())
            self.__key_path = self.__data['data']['key_location']
        self.__storage_client = storage.Client.from_service_account_json(self.__key_path)

    def upload_blob(self, project_name, df, destination_blob_name):
        """Uploads a file to the bucket."""

        bucket = self.__storage_client.bucket(project_name)
        blob = bucket.blob(destination_blob_name)
        blob.upload_from_string(df.to_csv(), 'text/csv')